School Portal Support

User guide and frequently asked questions for the Vericant School Portal, used by institutions to review interviews submitted by applicants 

User Guide to the Vericant School Portal for Institutions

Introduction

This document contains information for institutions on how to use the Vericant School Portal to view TOEFL ITP Plus for China score results.
The Vericant School Portal is an online tool for an institution to view Vericant Interviews and TOEFL ITP Plus for China scores of incoming applicants to that institution.
Since the Vericant Interviews are conducted by Vericant and the TOEFL ITP scores are received from ETS to Vericant, an institution can be assured that the information provided in the Vericant School Portal is verified.
Click here to download this guide as a PDF.

Technical Requirements

In order to access the Vericant School Portal a user needs a modern web browser, access to an email account, and an internet connection. For best viewing results, we recommend viewing on a tablet or desktop computer. 

Setting Up Accounts

You will need to create at least one “institutional user account” to access the Vericant School Portal and view TOEFL ITP Plus for China score results. An institution can have multiple Institutional users to accommodate the needs of multiple application reviewers in your institution’s workflow.

To set up an account:
  1. Go to schools.vericant.com/register
  2. Fill in the form with your email and choose a password. 
  3. Select your school from the drop down list (you can search for it by name) making sure to choose the correct level: 
    1. High school (if your institution is a high school)
    2. Undergraduate (if your institution is an undergraduate institution or pathway program)
    3. Graduate (if your institution or program is a graduate/postgraduate institution or program)
Important Notes:
  1. To confirm only staff from an institution can log in to the Vericant School Portal we require that the email for an account must match the institutional domain name in the Vericant database. If you use an institutional email address and it still fails, please contact us at customer_care@vericant.com and we will validate the domain name for you. 
  2. If you wish to receive scores from multiple student levels, you should create a unique log in for each level (i.e. High school, Undergraduate, Graduate) you need. 
  3. If you do not see your institution listed, or you do not see the level you wish to see, please use this form to request the school be added, or email us at customer_care@vericant.com.

Quick Start

For fastest on-boarding, we recommend that you log in and click through the quick walkthrough guide that begins as soon as you log in.

Usage

The Vericant School Portal consists of two main pages: the Student List page, and the Student Profile Page. Vericant also provides automatic email notifications.

Student List Page

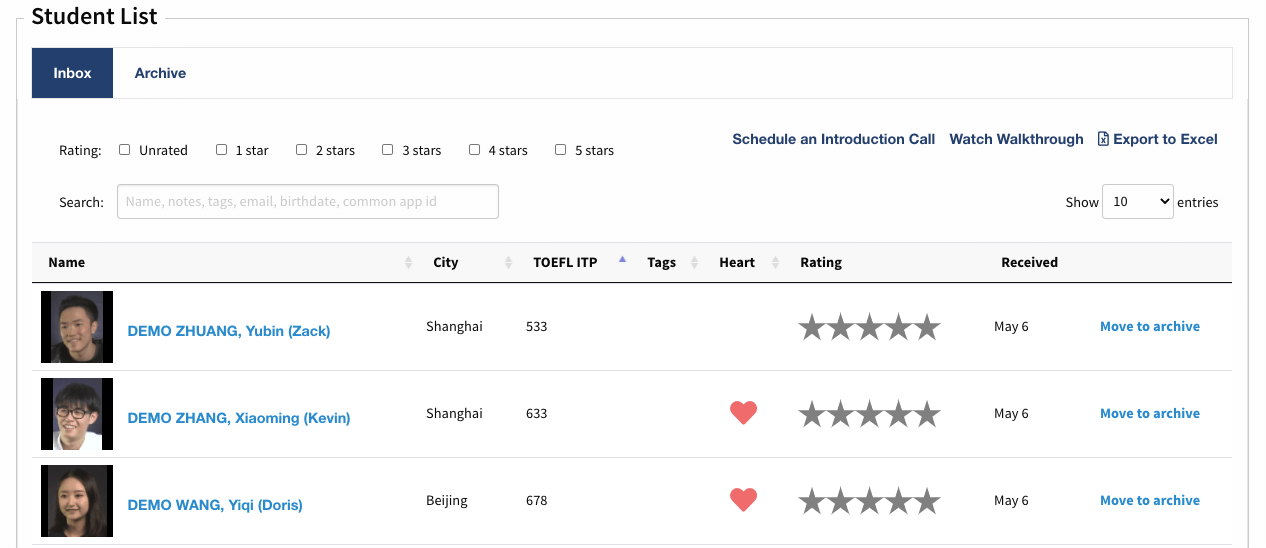
The Student List page is your main navigation page. This is where you find all your applicants in a list, search for specific applicants, filter down the applicants, or sort the applicants, and click to navigate to the Student Profile page of any of the applicants.

On this page, you may also pull out all your student data at once using the ‘Export to Excel’ function link on the top right of the page. Note that some of the information shared for applicants varies slightly by level.

Core Functionality:

  1. Search – Type in any data you would like to search by into the Search field. This could include names of students, city names, birthdates, email addresses, your custom tags or notes, and more.
  2. Sort – Click on the column headers to sort by the data in that column. For example, to sort by TOEFL ITP Score click on the TOEFL ITP header. Click on it again to reverse the order of the sorting.
  3. Go to a Student’s Profile – Click on a student’s name to enter their Student Profile page.
  4. Export all your data – Click on the “Export to Excel” link to retrieve a complete export of all of your data into a Microsoft Excel spreadsheet. See sample export files below. This file can also be saved and shared through email with your colleagues in your institution’s workflow. Note: The data shared in the excel file will differ slightly based on the level of your institution. For example, only undergraduate accounts receive Common App IDs and only high school accounts receive SEE scores in their data export.

Advanced Functionality:

  1. Archive – After reviewing or processing a student, you may wish to archive that student so that they no longer appear in your Inbox. Click on “Move to archive” to do so. Note that at any point in time you can go to the Archive tab (on the top) and find any student and move that student back to the Inbox.
  2. Filter by Rating – If during your review of students’ profiles you have given some students a star rating (a rating of 1-5 stars), you may use the rating filter to display students of only specific rating levels.

Student Profile Page

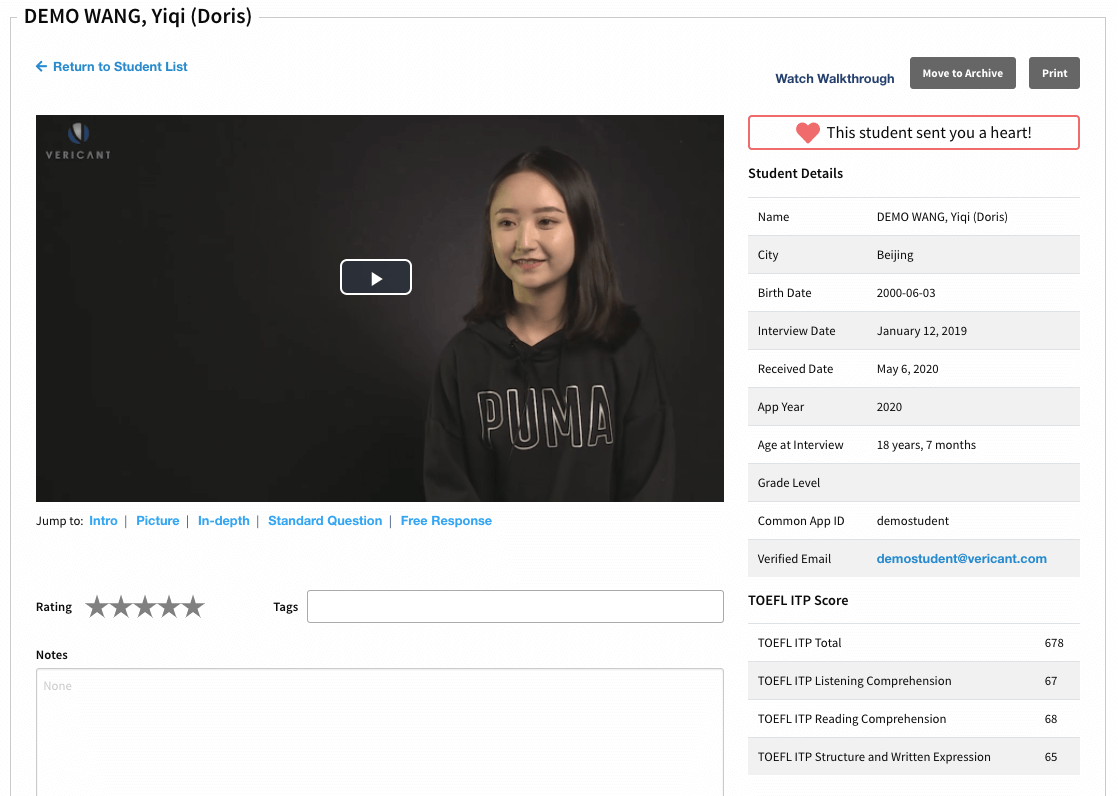
The Student Profile page is where you can find information about a specific student. This includes their Vericant Interview video, their TOEFL ITP Scores, identifying information, and any notes/tags/ratings you may have given them. You may also produce a printable report (which you can also save as a PDF file for digital filing) that contains all of the student’s information in one place, by clicking on the Print button at the top right of the page. This report can also be saved and shared through email with your colleagues in your institution’s workflow. Download a sample print profile PDF file.

Core Functionality

  1. See Student Details – On the right you will see information about a student’s scores along with profile information such as their name, age, location, test and interview dates, etc. Undergraduate schools can also find the Common App ID If a student has provided it during registration (it’s optional).
  2. Watch video –  Clicking the play button will start the video. Interview videos are typically 12-15 minutes long.
  3. Jump to video sections – Users can choose to watch the video from start to finish, or skip around using the interview section quick links provided under the video. If you are an undergraduate or graduate institution, you may also see a blue button titled “Watch Interview Highlight” under some student videos. Selecting this will jump you to the part of the interview the student most wants you to watch. It’s optional for students to set a highlight section.
  4. See TOEFL ITP Overall and Sub-scores – You can find the student’s TOEFL ITP score and subscores inside the student detail section.
  5. Print Profile – Above the Student Details you can find a print button. This generates a PDF view of the student’s profile that you can save as a PDF or print on a connected device. Download a sample print profile PDF file.

Advanced Functionality

  1. Receive Hearts – If you see the message “This student sent you a heart!” then this student has chosen to indicate to you that they have extra interest in your institution. Students only get 3 hearts to send each year (max 1 per school) and sending them is optional. If you receive a heart you can assume that you are one of this student’s top choices among all the schools they might be sending results to.
  2. Write Notes – In this box you can take notes about your applicant. Notes are searchable from the student list page. Notes, tags and star ratings are visible to any school user associated with your school. Remember to save your notes before leaving the student’s profile page.
  3. Add Tags – Type any word or phrase in this box and hit enter to create custom tags. Tags can help group your applicants. Some example tags include “Athlete”, “Musician”, or “For Committee”.
  4. Give Star Ratings – Give students your own rating on a 1-5 scale. Later you can filter or sort the student list page by this rating. You can change this rating any time.
  5. Move to Archive – Click this button to move the student from your inbox to your archive. You can move them back to your inbox at any time by clicking the “Move to Inbox” button that appears in the same location.
  6. Verified Email – You can click here to quickly email the student (or copy their email address) if you’d like to follow up with them.

Email Notifications

Vericant provides automatic email notifications based on student activity. By default, any time a student sends an institution their interview and scores, all users of that institution will receive an automatic email notification with the students basic information and a direct link to that students Student Profile page.
Instead of individual student notifications for every student, the Vericant School Portal can send a single daily digest email that includes all the new students that day. You may turn off notification emails entirely if you prefer.
You can change your notification settings by emailing Vericant at customer_care@vericant.com.

Slate Setup

For Institutions without Slate integration set up

To set up Slate integration with Vericant you’ll need to provide Vericant with the Vericant Slate username for the Slate SFTP server.

For directions on how to add the necessary standard resources and find the Vericant Slate username please see the Technolution’s Vericant documentation.

This username is usually in the form of vericant@{schools-admission-hostname}.edu. For example: vericant@admissions.myschool.edu. Once you confirm this user name and finish the set up steps outlined in the documentation (including adding the source format to your database), please send an email to customer_care@vericant.com requesting the integration be set up. You can also visit the settings page in your Vericant School Portal account and update your Slate username there in the field provided. 

Please also check that you have a remote path “incoming/vericant” on your school’s Slate setting.

Adding TOEFL ITP Scores after setting up Slate integration (or if Slate integration already enabled)

After setting up Slate integration institutions will need to add the new test type from the Slate Template Library for TOEFL ITP.  

If institutions do not add the new test type, things will continue to import as normal, but the students participating in the TOEFL ITP Plus for China solution will not have the TOEFL ITP test data imported as test scores. (They will still have the Vericant Interview Video viewer URL imported and be able to see the test scores on this page.)

Frequently Asked Questions: TOEFL ITP Plus and Slate

What if a user integrates with Slate after Vericant Interviews and/or TOEFL ITP scores have been delivered?

If an institution adds the test type after they have already received data, and they would like to import the TOEFL ITP data that was already received and processed, the institution should run a “Retroactive Refresh” and select TOEFL ITP destination source files to re-import from to pull the score data in.

For additional support with Slate integration, please see Technolutions documentation on Vericant.

You are welcome to submit a service desk request to Technolutions directly if you have any specific questions.

Where will the TOEFL ITP Plus for China score display in Slate?

The TOEFL ITP Plus for China test score will behave like any other test score through Slate that an institution has in the system. The score will appear on the student’s profile.  

What other settings should I change in Slate to accommodate these scores?

If you have specific items (like queries, documents that display within the Reader, etc.) that display any verified test score, then these scores will automatically appear there.  If there are areas where you are limiting which scores appear by the test type, then you may want to update your filter criteria to also include this new test type.

You may also want to consider checklist implications if you require the TOEFL iBT, and you do not normally allow the TOEFL ITP to fulfill the checklist item, but will allow the TOEFL ITP Plus for China to do so.  You will have to update their checklist fulfillment rules to accommodate this.

Frequently Asked Questions: School Portal

How do I create a Vericant account to receive student scores and interview videos?

  1. Visit schools.vericant.com/register
  2. Use your school email address for the username and choose a password. 
  3. Search and select your school from the drop down list. If you do not see your school in the list please contact customer_care@vericant.com and we will add you to our database of schools.

Please note: If your email fails the domain check, you can try again with another email address. If it still fails please contact us and we will validate the domain name in our system. After this validation you will be able to create an account.

How do I integrate Vericant with Slate?

To set up Slate integration with Vericant you’ll need to provide Vericant with the Vericant Slate username for the Slate SFTP server. For directions on how to add the necessary standard resources and find the Vericant Slate username please see the Slate Vericant documentation.

This username is usually in the form of vericant@{schools-admission-hostname}.edu. For example: vericant@admissions.myschool.edu. Once you confirm this user name with Technolutions, please send an email to customer_care@vericant.com requesting the integration be set up. Please also check that you have a remote path “incoming/vericant” on your school’s Slate setting.

How will I be notified when a student sends me their interview and scores?

Once you have created a school user account, you will be sent a daily update email with a summary of all of the students who have delivered interviews and TOEFL-ITP scores to you that day. You can log in to your Vericant school portal account at any time to see all of your current student deliveries.

Can my school set up multiple users?

Yes! Your school can set up as many log in accounts as you would like. All the notes, tags, and ratings made in the Vericant school portal will be visible to all of your school users.

Are Undergraduate and Graduate level accounts different?

High school applicants: applicants can do up to 3 Vericant High School Interviews in one application season. There is no limit for VPI Interviews. You must wait a minimum of 14 days between two official interviews or one VPI and official interview. There is no required wait time between two VPI interviews.

Undergraduate/Graduate school applicants: applicants can do the interview as many times as they would like and there is no required wait time between interview attempts.

How do I integrate the Vericant into my existing platform?

Download the Vericant Integration Guide🔗 here.

How do I set up an onboarding call with Vericant to learn more about the product?

Please click here to set up a call with a Vericant team member.

Institutions

Admissions officers and representatives of academic institutions and schools can contact our support team via e-mail: